http://cs5tutorial.net/superimpose-a-car-onto-another-image-in-photoshop/
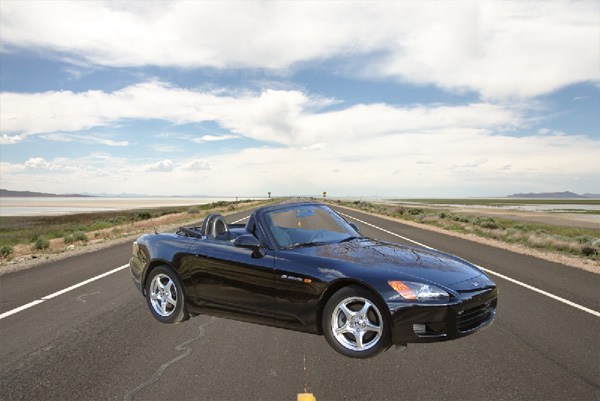
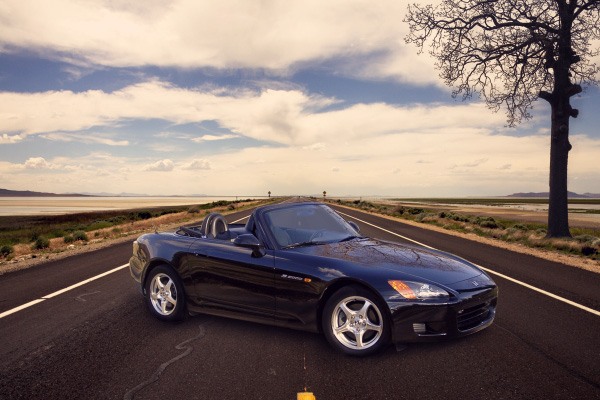
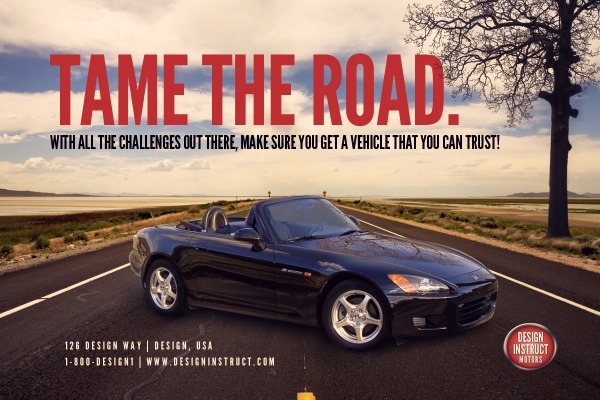
Preview
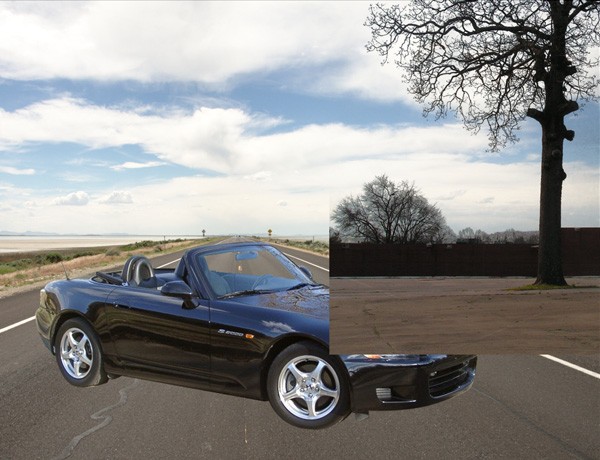
Click the image to view it in full scale.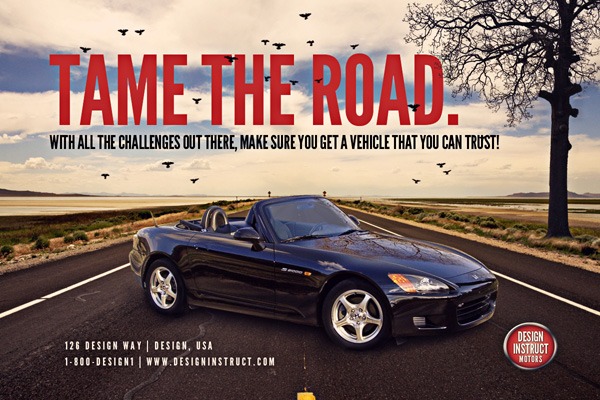
Tutorial Resources
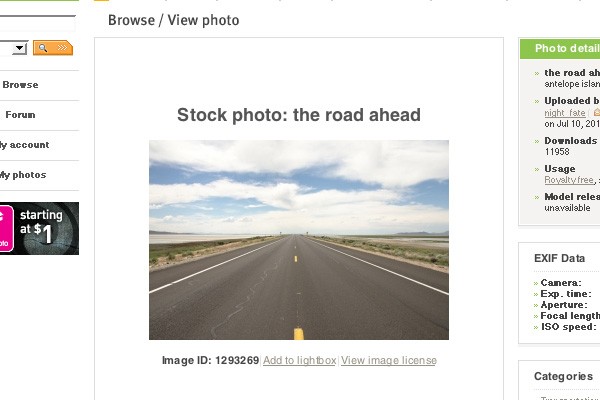
- Stock photo: The road ahead (Julia Starr)
- Stock photo: Cars and Coffee (Charles Williams)
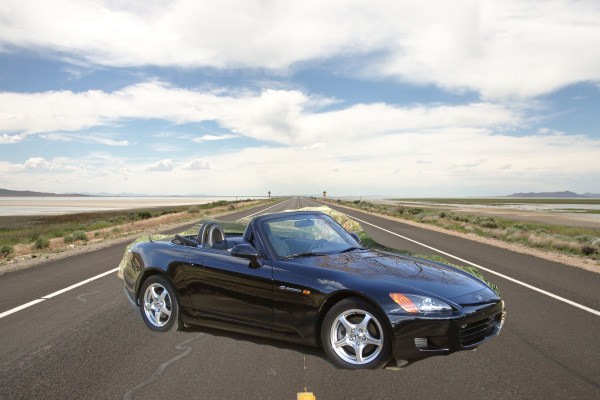
- Stock photo: Honda S2000 4 (David Resseguie)
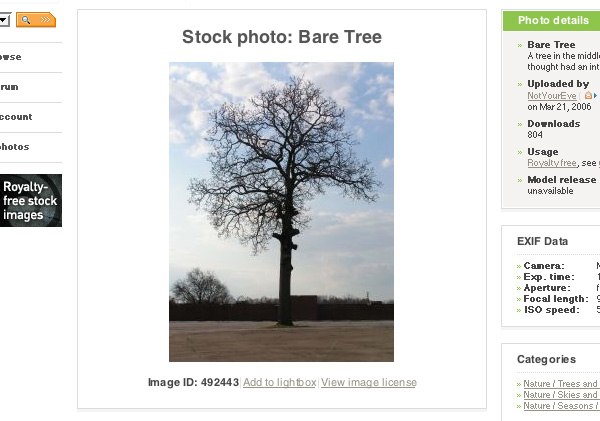
- Stock photo: Bare Tree (Jami Gilstrap)
- Brush library: Birds of a feather (midnightstouch)
- Font: League Gothic (The League of Moveable Type)
Step 1: Finding the Right Images
Usually when we start a tutorial, we ask you to open up either Photoshop or Illustrator and we get right into things. You usually get the tutorial resources already picked out for you, and that’s that.Although I’ll give you some suggested tutorial resources that we’ll use to build the final result, I want to go over the process of selecting the images for this tutorial. That way, if you choose to use your own stuff, you’ll know what to look for.
The hardest part in taking two separate complex images and putting them together into a single, cohesive composition is to have them as similar as possible in terms of scale and perspective. Things such as color and lighting are also important, but are easier to digitally manipulate using Photoshop, so they’re less of a priority in the image selection process.
If you have two images with different perspectives, you’ll need a lot of Photoshopping to fix the awkwardness of the relationship between the two images.
The most time-consuming part of creating the scene in this tutorial was finding the images to put together. There are many different places to find images, from free options such as stock.xchng, morgueFile and Flickr (be sure to check the terms of use of the images in these sites) to paid stock photo sites like Thinkstock or pixmac.

For the composition we want to create, I know I want a car and a background of some sort. I want something dramatic for the background and a nice, sporty car for the subject of the scene.
After lots of searching around the web, I found my background image from stock.xchng. I had to ask permission to use it in this tutorial as per the author’s instructions.
Step 2: Finding a Good Car Photo
Now that we have our background image, we can start looking for our car image to put on it.To check if the cars match the background, create a new document (Ctrl/Cmd + N) in Photoshop at 1200×800px and bring the background image into it. Adjust the size of the image using Free Transform (Ctrl/Cmd + T) so it’s a little wider than the canvas.
Bring in the first car we want to try. I got this car by Charles Williams through Flickr. Make sure you have the car layer selected and then go to Layer > Layer Mask > Reveal All to add a layer mask.
Using a black brush, quickly paint away the background and foreground of the image so just the car is remaining. This doesn’t need to be perfect because we’re just testing the waters to see if the angle of the car works with the background image.
As you can see, this car looks OK, but the angles of the back are a little off compared to the angle of the road.
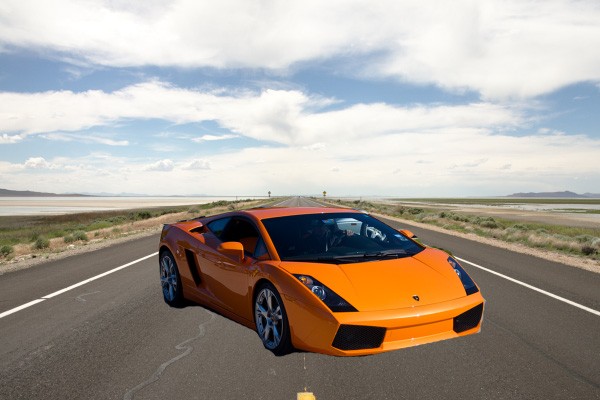
So back to square one for the sports car. We’ll have to keep looking! You can use the same technique above just to check if the car you selected will work with the background.
After a little more searching, I found a car that fits our road angle pretty well. It’s a nice sporty car that should work nicely with our background image.
Step 3: Cutting Out the Car
Take the original car image and open it up in Photoshop. Use the Pen Tool (P) in Paths mode to trace around the car.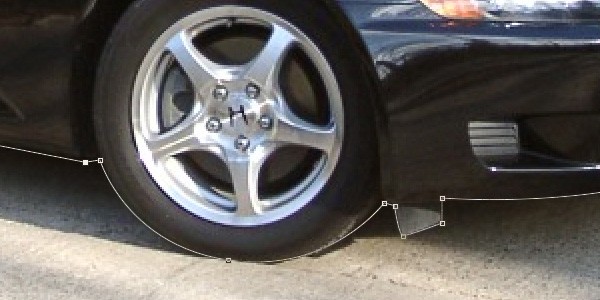
Right-click on the path, and choose Make Selection. We want to bring the car into our main Photoshop document where the background is, so just copy and paste the selection of the car.
Use Edit > Transform > Scale to reduce the car to about 97% of its original size because we want to make sure that the scale of the car matches up with the background.
Step 4: Correcting Surface Reflections
When you take an object from another image (especially when it’s something reflective like a car) we have to worry about what’s being reflected on its surface. For our car, we have clouds and the tree on the hood (which doesn’t exist in the background). Being wary of the details makes sure we don’t make the front page of Photoshop Disasters.Since the clouds and sky are pretty consistent to the clouds and sky in the background image, we don’t have to worry too much about those.
However, we do have to correct that tree reflection. To fix the issue, we can either go with the Clone Tool and start cloning away the tree by sampling around the other parts of the hood — which would be very time-consuming and probably not give us the best result — or we can go the other way and add a tree to our background image.
Adding a tree to the image will be much easier, at least for this situation. It will also give the scene some added character. So let’s go ahead and find a tree image.
From the reflection, it looks like there aren’t much leaves on the tree, so with that in mind, I found this tree.
Step 5: Preparing the Tree for the Scene
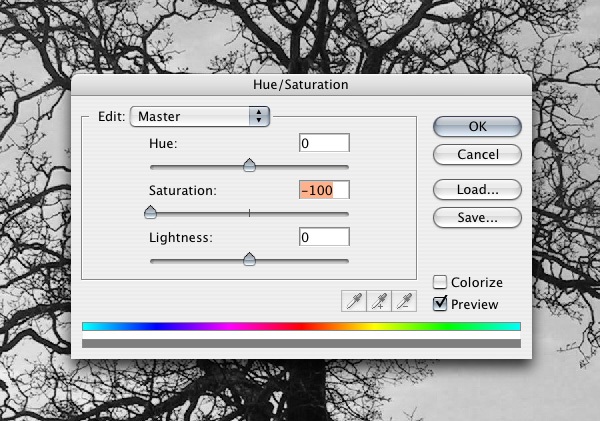
Open up the tree photo into Photoshop. We want to cut out the sky from the tree so we can use it seamlessly within our scene.First, go to Layer > Duplicate to duplicate the tree layer. With the new duplicated layer, we’re going to go to Image > Adjustments > Hue/Saturation and drop the Saturation down to -100.
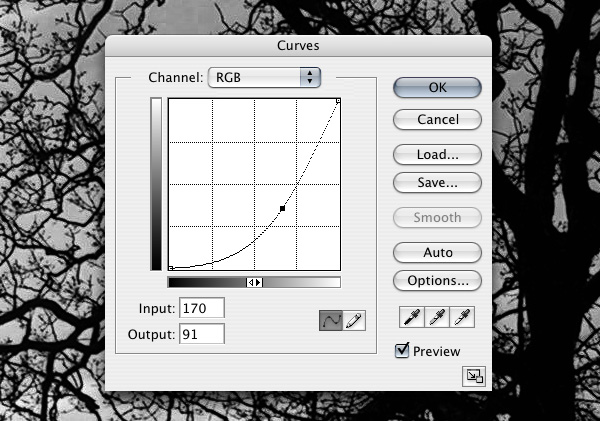
Next, go to Image > Adjustment > Curves and darken the image — this will darken our branches, making it easier to subtract them from the background.
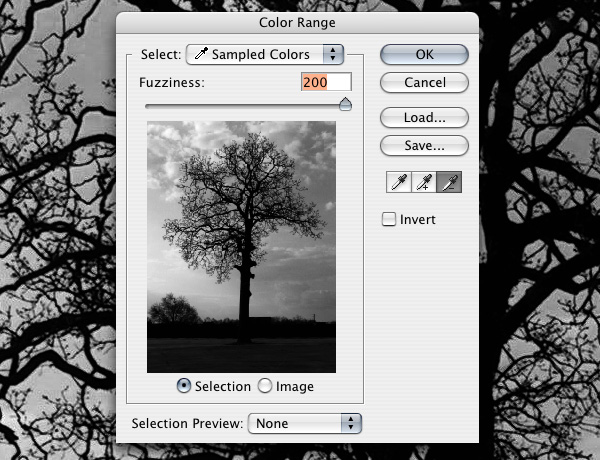
Go to Select > Color Range. Change the Fuzziness option to 200 and click OK. This selects the tree.
In the Layers Panel, click on the original tree layer and then go to Layer > New >Layer via Copy to create a third layer with just the tree in it.
Then, on the new layer, we’ll use Layer > Matting > Remove White Matte. This will give some body to the thinner branches.
Lower the layer Opacity of the tree temporarily so we can see its background a little bit, and then place the bottom of the trunk on the grass to the right of the road, where its reflection on the car would be. Resize the tree to about 42% to match the scale of our composition.
Step 6: Retouching the Tree Layer
We want to get rid of all the extra stuff around the tree, so go to Layer > Add Layer Mask > Reveal All to add a layer mask on the tree layer. And then, with a black brush, start masking away parts of the tree layer that shouldn’t be there. Make sure you keep the tree trunk as well as the grass underneath it. We’re also going to mask away some of the bottom of the tree to blend it in with the grass.
Step 7: Making the Images Crisper
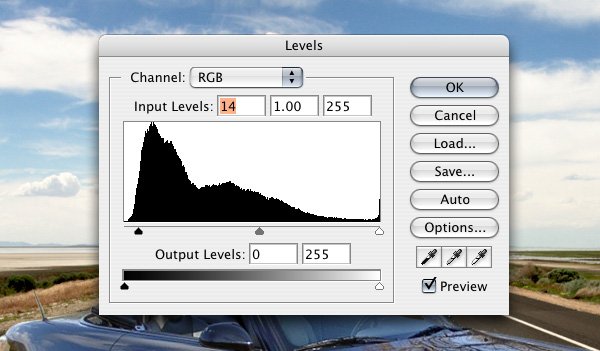
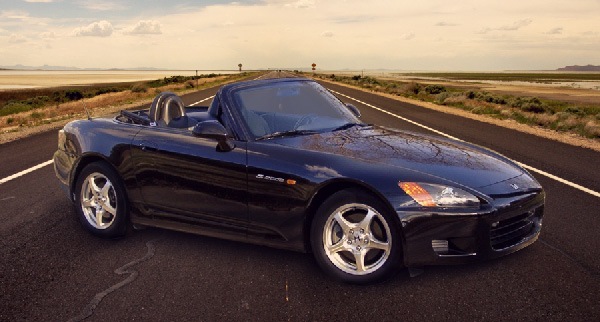
The background is a little too washed out, so select the background layer and go to Image > Adjustment > Levels and bring in the left slider to increase the black point of the layer.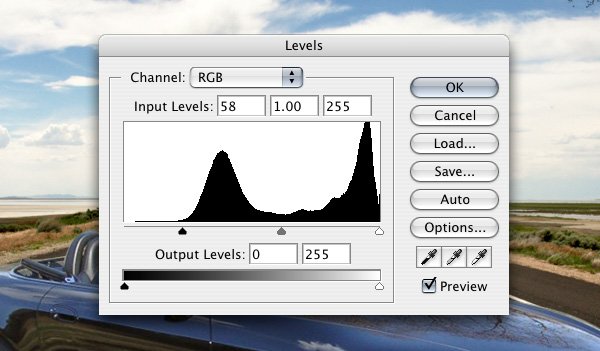
Do the same Levels image adjustment on the car layer.
Step 8: Adding the Car Shadows
Now we’re going to start working on the shadow of the car. Make sure that the car layer is the active layer, then choose Select > Load Selection to place a selection around the car. Create a new layer and fill the selected area with black.On the new layer, choose Filter > Blur > Gaussian Blur, set the Radius at 12px, then press OK to run the filter.

Use the Move Tool (V) to move the blurred layer down and to the left a little bit, to offset it away from the car a tiny bit.
Add a layer mask on the blurred layer by choosing Layer > Add Layer Mask > Reveal All. With a black brush, start masking away all the black areas that’s around the outer edge so that the area doesn’t have a shadow.
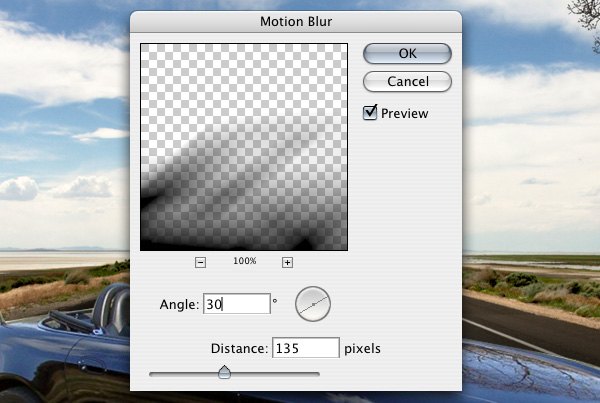
Create another black-filled selection of the car (Select > Load Selection and fill the selected area with black). This time we’re going use Filter > Blur > Motion Blur.
Add a layer mask on this new blurred layer (Layer > Add Layer Mask > Reveal All) and, again, mask away the black areas at the outer edge of the car.
We want to continue masking away some of the shadows in front of the tires because the light source will get to them before it gets underneath the car.

Step 9: Darkening the Tires
Create a new layer above the car layer. Using a black brush with 0% Hardness, 20px Master Diameter and 20% Opacity to start masking away the lighter areas of the tires.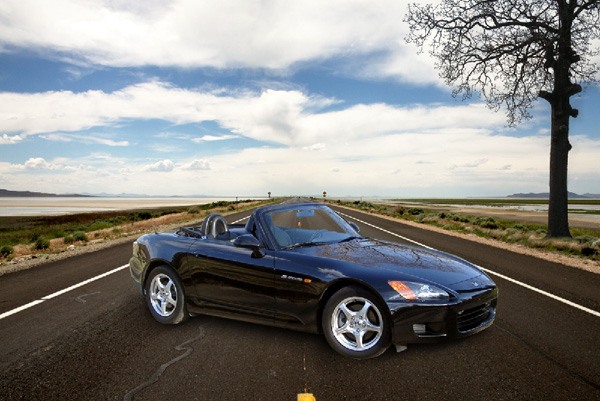
Step 10: Retouching the Windshield
To fill in the windshield, first we’re going to sample the blue color from the inside of the car door (located at the left of the steering wheel) using the Eyedropper Tool (I).Next, create a new layer above the car layer and use a 0% Hardness brush to start masking away the windshield area. Drop the layer’s Opacity down to 80%. This, in effect, allows the background of our scene to show through.

Step 11: Blending the Composition’s Colors
To get the colors on the car and the colors in the background to match up, we’re going to add a Gradient Map adjustment layer on top of all the layers. In the Layers Panel, click on the topmost layer to ensure that the new adjustment layer is added to the top of the layer stack. Then, go to Layer > New Adjustment Layer > Gradient Map. Use the Violet, Orange gradient preset.
Then, drop the adjustment layer’s Opacity down to 15%.
Duplicate the Gradient Map adjustment layer by going to Layer > Duplicate and then change the duplicate’s Blend Mode to Overlay. In the Layers Panel, move the Gradient Map adjustment layer copy below the original Gradient Map adjustment layer.
Step 12: Adding a Sunset Look-and-Feel
We’re going to give our horizon an orange, sunset type look-and-feel. To do this, we’re going to add a yellow-orange color.First, create a new layer just above the background layer. For your Foreground color, choose a yellow-orange color (#FFAE00).
Choose the Gradient Tool (G), set it to the Foreground to Transparent gradient preset, and pick the Reflected Gradient option in the Options Bar.
Create a color gradient starting at the horizon line of the background image to the top of the front tire.

Change the Blend Mode of the layer to Soft Light and drop the Opacity down to 20%.
Since we have the orange hue in the background, we also want to add it to the car as well.
Create a new layer above the car layer and, using the same yellow-orange Foreground color (#FFAE00), start painting over the edges and highlights of the car. Afterwards, lower the layer’s Opacity to 20% and change the Blend Mode to Soft Light.
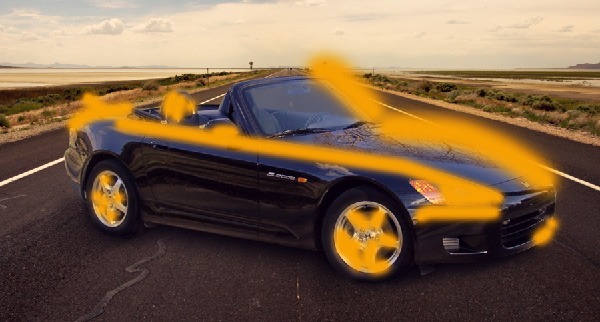
Next, we need to get rid of the highlight that isn’t on the car. First, click on the car layer in the Layers Panel and then choose Select > Load Selection to place a selection around the car. Click on the windshield layer and go to Select > Load Selection again, and this time, make sure you pick Add to Selection. Go to Select > Inverse, click on the orange highlight layer and delete.
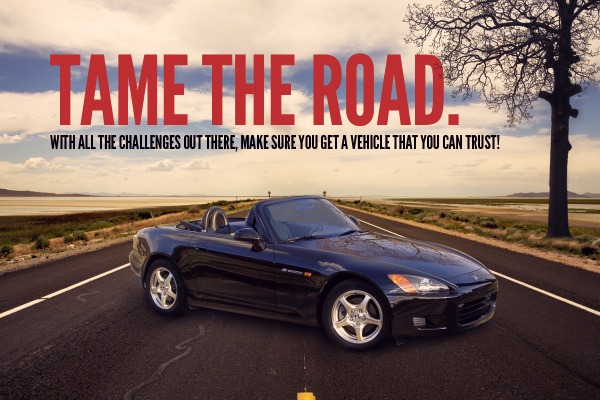
Step 13: Adding Some Text
Now we can place some text on our image.We’ll start with the headline: “TAME THE ROAD.” using League Gothic in red (#CC3333). Also, place a tagline below in black and use a smaller font.
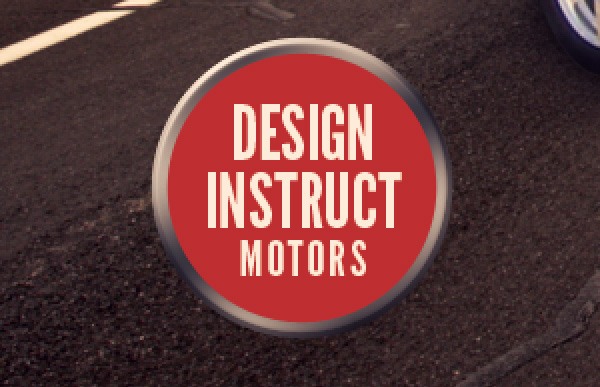
Step 14: Creating a Simple Logo
We’re going to make a basic circular logo.First, use the Horizontal Type Tool (T) to create the text inside the logo; I used the text, “DESIGN INSTRUCT MOTORS” with each word being on its own line.
Using the Ellipse Tool, make a circle around the text with the same red color (#CC3333) we used in the headline text.
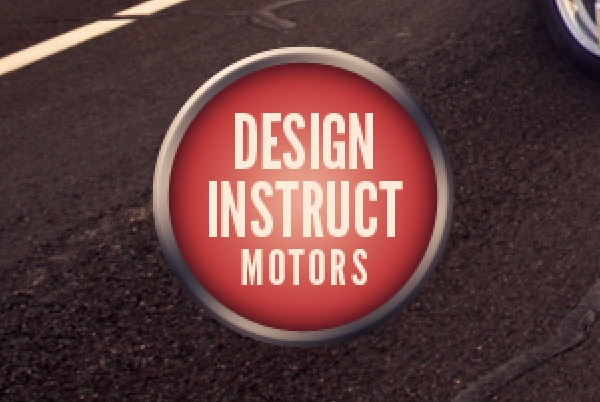
Next, go to Layer > Duplicate Layer to duplicate the circle. Fill the new circle with light gray (#CCCCCC).
Then, go to Edit > Free Transform, hold down Alt + Shift and then drag out one of the corner transform controls to make the gray circle a little bigger.
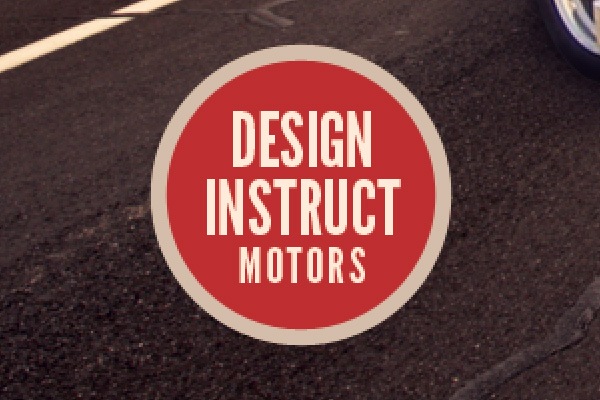
Now we’re going to apply a layer style on the outer circle. Double-click on the layer to open the Layer Style dialog window. Afterwards, add the following layer styles:
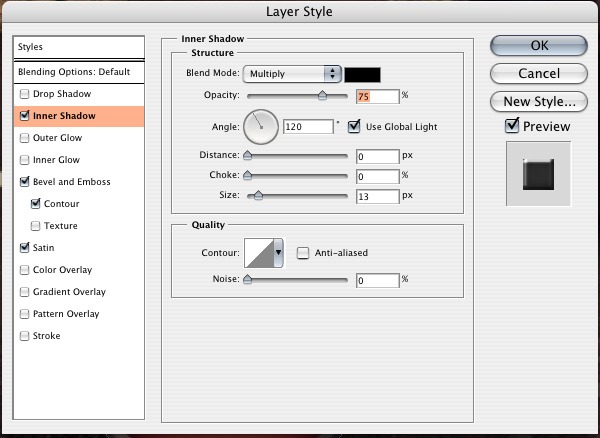
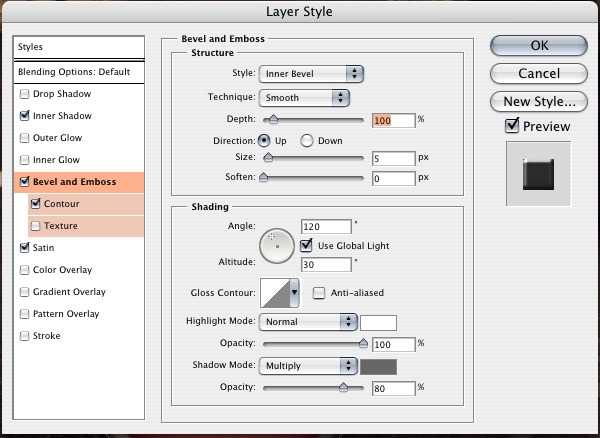
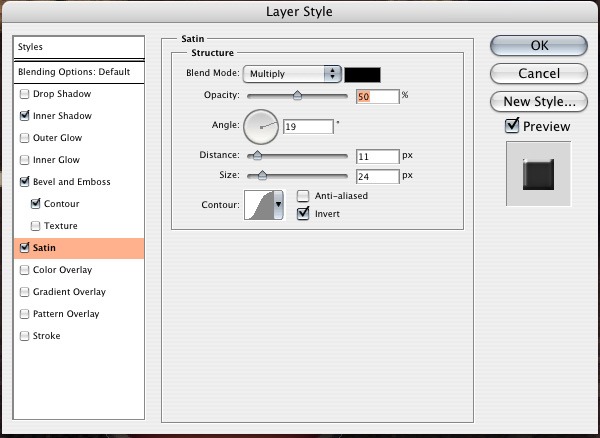

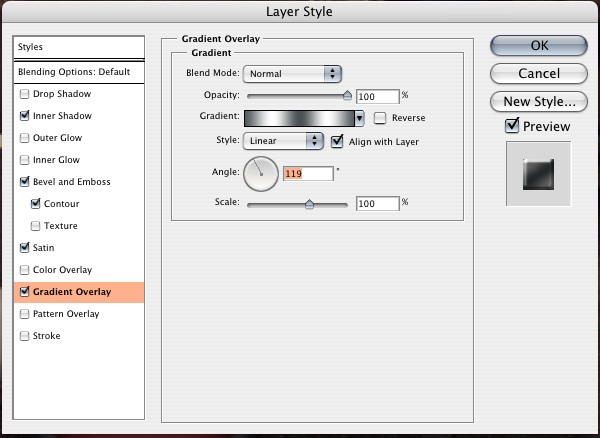
We’re going to give the inner red circle a layer style as well (use the images below for reference).


Then we’re going to give the text inside the logo a layer style (use the images below for reference).


Link the two circles together by selecting both of them in the Layers Panel, right-clicking on one of them, and choosing Link Layers in the contextual menu.
Switch to Free Transform (Ctrl/Cmd + T). While holding Alt, click-and-drag down the top-center transform control so the circles become an oval.
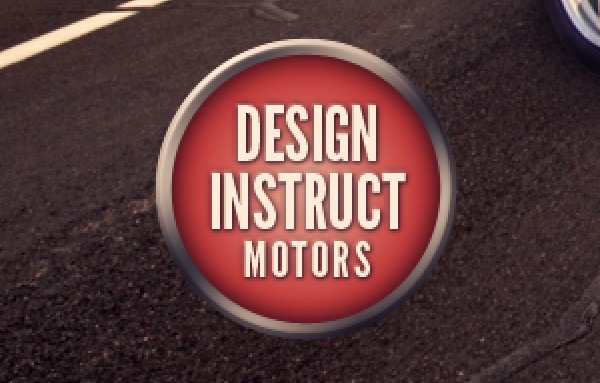
In the Layers Panel, select the two ovals and the text, then right-click on one of them and choose Link Layers in the contextual menu. Then choose Layer > Merge Linked so that we can adjust the size of the logo without having the layer styles adjust.

We’re going to shrink down the logo and move it to the bottom-right of our canvas. I also added some contact information on the bottom-left side using the same font we’ve been using.
Step 15: Adding Birds to the Scene
As an additional point of interest, we’re going to add some birds around the text. Download and install this bird brush library and, on a new layer, add some birds on our scene. It’s best to put in a few groups of birds, then using a layer mask, mask away birds you don’t want.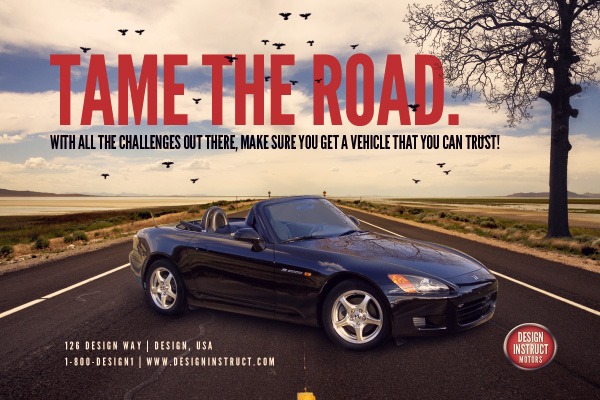
Step 16: Sharpen the Image
As our final step, we’re going to sharpen the image using the High Pass filter. First we want to flatten our image by going to Layer > Flatten Image. Next, go to Layer > Duplicate Layer to duplicate the resultant layer.On the duplicate layer, use Filter > Other > High Pass, set the Radius to around 10px, and then click OK to apply the filter.
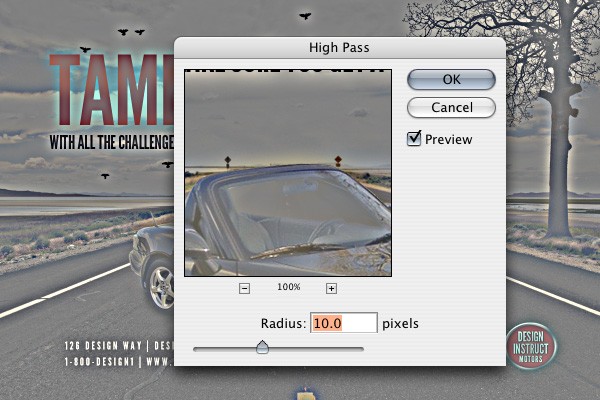
Finally, change the Blend Mode of the layer to Soft Light.
Tutorial Summary
In this Photoshop tutorial, we combined several images to create a unified digital composition. I walked you through my process of selecting the right images to use together and showed you some techniques for harmoniously combining different objects together.
No comments:
Post a Comment